
How To Replace Snowmobile Track Clips

Snowmobile track clips are attached to the windows of snowmobile tracks so they can slide against hyfax on the bottom of the suspension rails. Snowmobile track clips typically last for the life of a track, but in some cases the metal sliders or guides might need to be replaced if they’re bent or cracked after striking a rock, stump or other hard object. Too many miles through abrasive, low-snow conditions can wear down the clips and even make them become brittle. What’s key for removing the old clips and installing new ones is to have the right tools and equipment for the job. Let’s get started.
How To Remove Worn Snowmobile Track Clips
Lay the snowmobile on its side over a piece of cardboard or carpet. Remove the rear suspension and set it aside for easy access to the track and to eliminate interference with the tools and equipment. The track shown here was a recent Craigslist find, so we were able to work on a table.
With the suspension out of the way, inspect each clip and highlight with a paint pen or marker which ones need to be replaced. There are two good ways to remove worn snowmobile track clips.
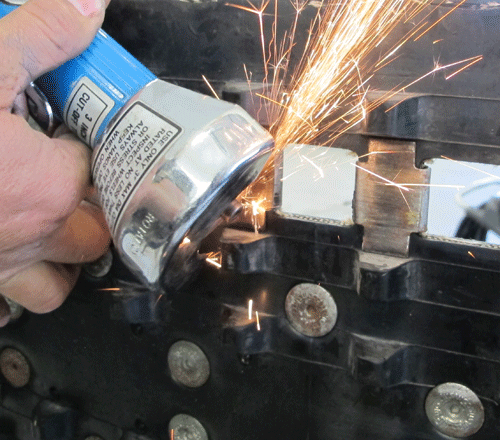
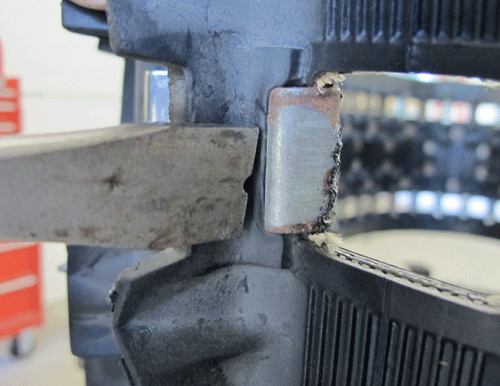
If you use a cutoff tool with a 3-inch disc, cut a diagonal line through the surface of the clip that glides along the hyfax, and then pry the two pieces off of the track with a large screwdriver or small pry bar.
Another method is to use an air chisel. This works faster to push the old clips off the track. Set the chisel’s tip on the track where the rubber is exposed between clip on the lug side of the grauser bar, and then squeeze the trigger while pushing to separate the clip from the track. The clips will pop off quickly and easily.
Some tracks have slide clips and guide clips, or every other window might be without a clip to save weight. If your track has an irregular pattern like this, note this information before you remove the old clips so you correctly repeat the pattern. It might be best to remove and replace each clip as you go if you need to replace just a handful of clips.
Installation Of New Snowmobile Track Clips
To install new track clips, you’ll need an impact wrench and a track clip installation tool. Installation tools cost about $100 and are available through suppliers like Parts Unlimited, Dennis Kirk and Hi-Performance Engineering. Snowmobile dealerships and repair shops typically have this heavy-duty tool in their specialty tools cabinet, and a shop might let you rent it if you ask nicely.
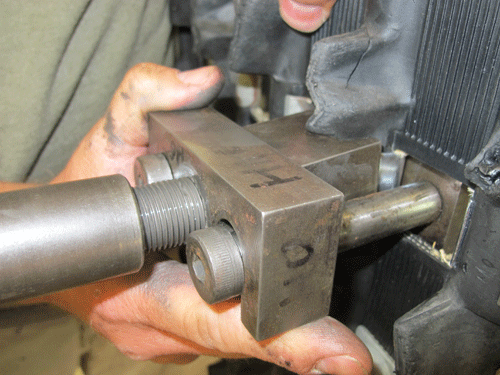
The installation tool fits around the track’s grauser bars to which the clips fasten. A big bolt is also part of the tool. When the bolt is tightened, it pulls together the two pieces and the tapered end of the installation tool pinches the new clip together so it fits around the grauser bar. The bolt can be tightened with a ratchet or wrench, but it’s much easier and faster to use an impact wrench. We used a battery-powered impact tool for this story.
To install, put the new clip on the track and squeeze it by hand with a plier. Now put the base of the installation tool on the inside of the track and feed its legs through the windows on each side of the grauser bar. Put the top half of the tool on the base and turn the tool’s bolt into the base a few turns, making a proverbial track clip sandwich: The installation tool’s halves are slices of bread, the track bar is the peanut butter and the new clip is the jelly. While holding the sandwich with one hand and making sure the clip is correctly installed, put the impact tool’s socket on the bolt and tighten it until the clip is tight. It doesn’t matter if the track has lugs over the grauser bars because the tool will compress them and pull the clips on the track.
Buying The Right Snowmobile Track Clips
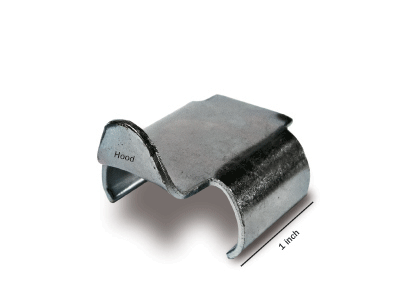 Most snowmobile tracks produced since the early 1990s have windows — also called punch-outs — of at least 1 inch wide, but some late-model tracks have 1.5-inch windows. This is the primary dimension to determine which clip can be used, but know that a clip’s width doesn’t have to be the same as the window’s width. This means that it’s OK to use a 1-inch clip on a track with 1.5-inch windows. Older tracks have narrower windows.
Guide clips for Arctic Cat snowmobiles with the ACT or Diamond Drive system require a short hood so they don’t contact the gear case when the track rolls around it. Taking it to the extreme, tracks on oval racing sleds typically have tall guide clips to help prevent the track from de-railing. Some clips are ribbed for less drag, while others have holes to reduce weight.
Editor’s Note: Every Snow Goer issue includes in-depth sled reports and comparisons, aftermarket gear and accessories reviews, riding destination articles, do-it-yourself repair information, snowmobile technology and more. Subscribe to Snow Goer now to receive print and/or digital issues.

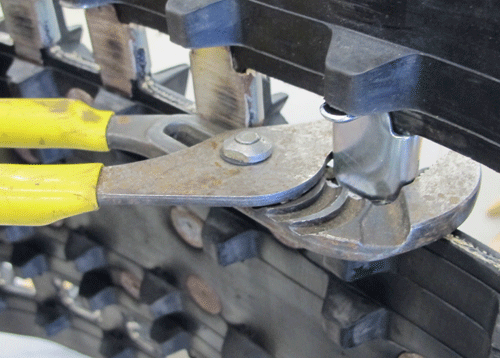
I made a tool that makes removing clips easy . The tool fits on a 12 in ratchet . The best thing about it ,no removal of track or suspension. Thanks Joe
Is like to know more about this tool you made to remove track clips.
I woild like to know more about this tool.