
 Rebuilding a two-stroke engine’s top end includes servicing the cylinders, pistons, rings and related gaskets and O-rings. The top end of a two-stroke engine might need to be rebuilt if there’s been a reduction in compression that can cause hard starting when the engine is warm, inability to idle or a loss in power. Factors such as water in the gas or an improper fuel/air ratio can cause damage that causes low compression. Snowmobiles with high miles might also benefit from a top-end rebuild to keep them reliable and fun to drive. Here are tips for the teardown and assembly procedures of a two-stroke engine’s top end. This isn’t a step-by-step assembly guide, but instead it covers rebuild procedures that, if followed, will help ensure the engine you service will be reliable and run like a champ.
2-Stroke Piston Removal
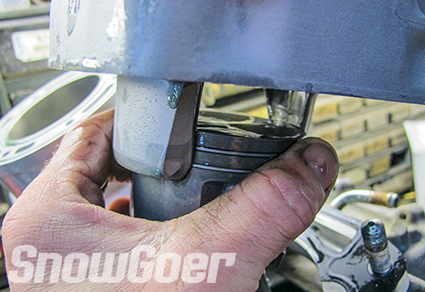
Circlips are what hold a wrist pin inside of the piston, and a wrist pin secures a piston on a crankshaft’s connecting rod. It’s recommended to use a piston pin puller to remove the old piston from the connecting rod. Piston pin removal tools typically have a threaded rod with a nut on one end and a ‘T’ handle on the other end. Turning the handle pulls the nut toward the ‘T’ while simultaneously pulling the wrist pin out of the piston. To remove a wrist pin, lay a clean shop rag over the engine’s bottom end to catch an errant circlip or other debris and then pry out one circlip with a small screwdriver or pick. Insert the tool through the wrist pin and put the nut on the tool. Now begin turning the handle while simultaneously holding the nut until the wrist pin slides out of the piston. Never reuse a piston circlip. Many Rotax engines require a special tool to capture the wrist pin bearing’s needles.
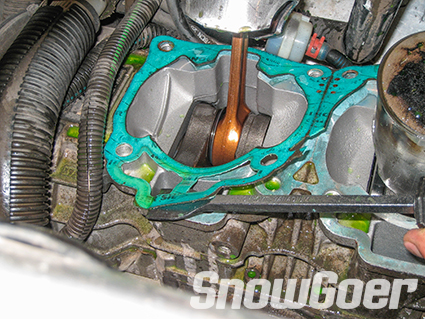
2-Stroke Gasket Surfaces Prep
After removing a cylinder, chances are good that at least some of the base gasket material will be stuck to the crankcase and bottom of the cylinder, and it needs to be removed to ensure an airtight seal is achieved when the cylinder and case are reunited. The same goes for engines that have a paper gasket between the head and cylinder. A razor blade or gasket scraper works well to remove gasket material, but the tool might catch the edge and cause a nick or burr, which could compromise the seal. For stubborn gaskets, apply gasket remover to help break down the material. Lay a clean shop towel on the crankshaft to catch debris while you work, and be sure that all gasket surfaces are perfectly clean before reassembling the engine.
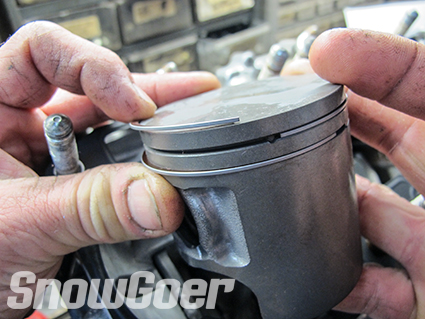
2-Stroke Piston Ring Installation
Most piston rings have a top and bottom surface, so it’s important to install them as intended. Some rings are tapered on the top surface to let cylinder pressure slip under the ring and force the ring against the cylinder to form a good seal. Look for a letter on the top of the ring to imply that surface faces up.
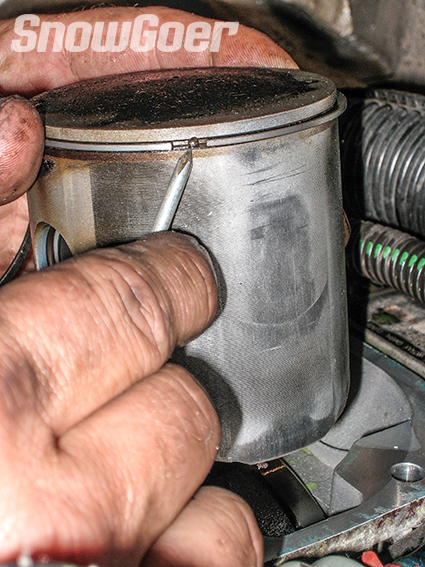
2-Stroke Piston Positioning
Pistons typically have a mark on the crown to indicate how they should be positioned. The mark usually points toward the cylinder’s exhaust port or recoil, but another way to make sure it’s correctly oriented is to check the position of the piston ring locator pins. One pin is in each ring groove, and when the piston is correctly installed, the pin or pins (depending on how many rings the piston carries) should point away from the exhaust port. If the ring end gap passes through a port, which could hook the ring when it passes by the opening, something is probably installed incorrectly.
2-Stroke Circlip Installation
The gap in a circlip should be set at the six or 12 o’clock position on the end of a wrist pin. Conversely, if the opening is set at three or nine o’clock the clip will compress each time the crankshaft reaches top- and bottom-dead center, which could allow the clip to pop out of the piston. If that happens, it usually leads to catastrophic engine failure. Lay a clean towel on the bottom end and push the circlip into the piston with a finger or hard object. Don’t squeeze a circlip with a plier and never wedge a screwdriver under the clip because doing so could cause the clip to lose its natural tension. If you’re a rookie, buy extra clips in case you damage a clip or two, or one flings out and ends up under the beer fridge. Because the clips are under high tension, it’s a good idea to wear safety glasses. Install the piston rings before putting the piston on the connecting rod, and do it over a workbench. While you’re at the bench, put the inner circlip in the piston, too.
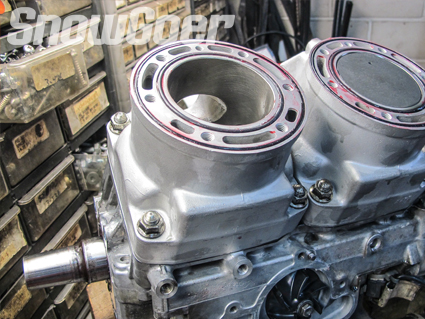
2-Stroke Cylinder Bore Prep & Ring End Gap
If an engine has been run for more than a few thousand miles, its cylinder bores should be measured by a knowledgeable shop or dealership to make sure the holes are perfectly round, and ring end gaps and piston-to-cylinder-wall clearances will be within specification when the new parts are installed. Modern cylinders with Nikasil coating are remarkably durable, but they should at least have a ball hone briefly run through them to cut a fresh crosshatch in the wall. The cylinder will need to be bored if it suffered damage from a burndown or other failure.
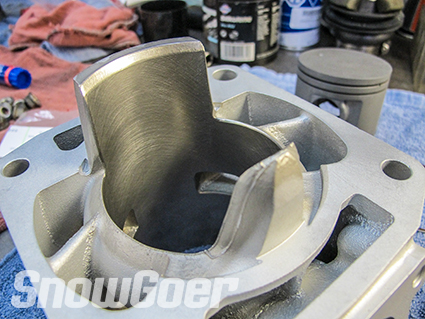
2-Stroke Cylinder Installation
Installing a cylinder is easier with help from a buddy who can support the cylinder’s weight by holding it. Compress the top piston ring with fingers and carefully slide the cylinder over the ring; repeat the process for the piston’s second ring, if applicable. You might have to slightly rock the cylinder, but it should easily slide over the rings – do not force it. Once you slip the cylinder over the rings rotate the cylinder slightly to the left and right to make sure the rings move with it – just a few thousandths of an inch until they touch their respective locator pins – to prove the rings aren’t pinched. For a monoblock cylinder, rotate the crankshaft to bring one piston high before attempting to slip the cylinder over the rings. Once one bore is around a piston, rotate the crankshaft to raise the next piston. The bore of the cylinder must be coated with oil before installation so it won’t be dry upon initial start-up.
Bleed Coolant System
An important step of rebuilding a liquid-cooled engine is to bleed the coolant system. The system for the sled you’re servicing might call for a specific method, so consult a dealer to make sure you do it correctly. In many cases, the front end of a snowmobile needs to be elevated with the cooling system ventilated while the engine idles. This flows coolant to the rear of the machine to purge air out of the heat exchangers. Top off the coolant system as necessary with a mix of antifreeze and water during the bleeding process, and feel the heat exchangers with a bare hand to make sure all of them are warm to indicate coolant is circulating.
Quick Tips
- Tighten all fasteners to the engine manufacturer’s torque specification
- Lubricate engine fasteners with oil to help ensure the correct torque specification is achieved
- Coat the piston pin and bearing with assembly lube – or two-stroke engine oil – upon assembly
- Don’t use gasket makers or silicone in conjunction with gaskets or O-rings
- Coat engine O-rings with a thin film of grease to keep them pliable and hold them in place during assembly
- Before assembly, look into the crankcase and make sure there isn’t debris inside, and coolant that dripped down during teardown should be sucked out with a turkey baster or patted with a clean towel.
- Lubricate the crankshaft bearings with a few drops of two-stroke oil before assembling the engine
Editor’s Note: Every Snow Goer issue includes in-depth sled reports and comparisons, aftermarket gear and accessories reviews, riding destination articles, do-it-yourself repair information, snowmobile technology and more. Subscribe to Snow Goer now to receive print and/or digital issues.
I thought ball-hones were bad to use on a 2stroke, I was told only use the hones with the straight arms vs a ball hone, because a ball hone can grab a port and chip the cylinder! Is this untrue?..from Wyoming USA 🇺🇸 👋🤠
Straight arm hone will not work. The stones will catch the ports and break. I tried that and had to switch to a ball hone and it was perfect! There are some good clips on you tube as well.